Python tutorial for semantic segmentation in Amazon SageMaker from an existing endpoint
Info! To understand and reproduce this tutorial, it is highly recommend to read/follow the tutorial presented here. In this post, it is considered your are familiar with the datasets, basic AWS console usage, AWS credentials, machine learning terms, so on.

Scientific evolution has never been more supported by computing than it is today. With the dynamism of the environment in which we live and consequently of the complexity that surrounds it, equally complex studies are generated every year, which due to this complexity, sometimes require computational power in storage and processing suits never seen before. Therefore, understanding basic computing processes and technologies existing today has been essential for the continuity of research.
Here, an example using cloud computing for the autonomous detection of objects in digital images, which can still be extended to applications in remote sensing, medicine, autonomous driving, among others.
The following tutorial, is mainly for jupyter notebook, and made some minimal modification for external processing. I’ve created a project that is able to prepare my dataset locally, upload it to S3, train, and finally deploy the model predictor to the same bucket.
The code has been shared in my github account, and I will make some considerations around the main difficulties to execute, train and finally infer over your images.
Perfect!
First of all, you need to set up your environment in AWS console, which is basically your role permission and limit to use a GPU instance. This last one you will need to submit a request to AWS team, explain your needs. You probably will get a reply after one day. To set your user role to use SageMaker, just check the following steps:
- Open you AWS console
- Click over upper right option under your username, and ‘My security credentials’
- Once IAM console page is open, click ‘Role’
- Click on ‘Create Role’ button
- Search for ‘SageMaker’ and click it on
- Select ‘SageMaker - Execution’
- Click on ‘Next: Permissions’ button
- In the next page, search for ‘AmazonSageMakerFullAccess’
- Click on ‘Next: Tags’ button
- Click on ‘Next: Review’ button
- Give the role a name, then, create
- Right after, click over the following role, and copy your ‘Role ARN’
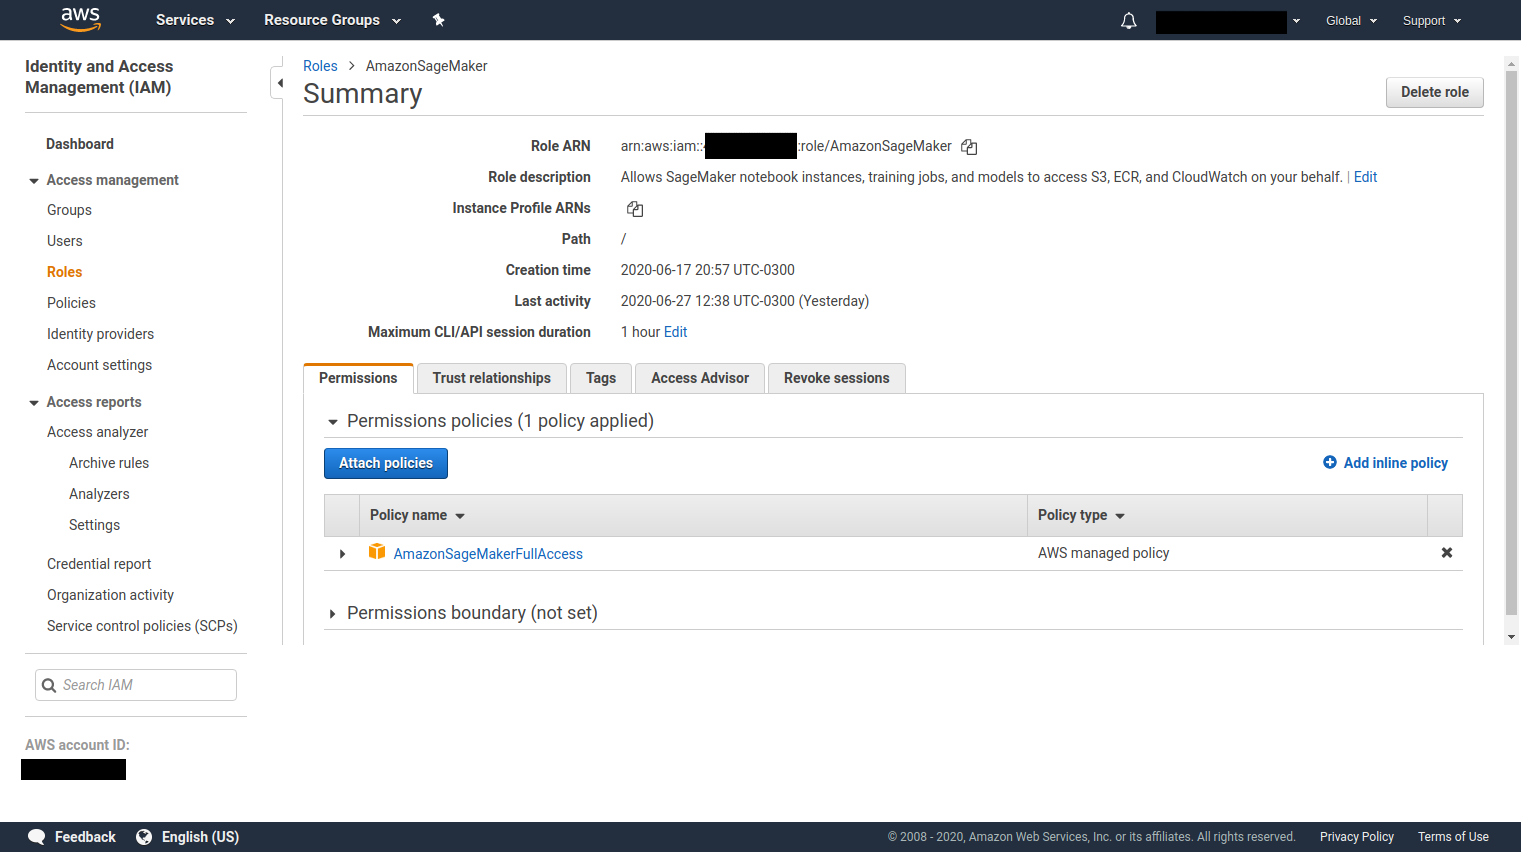 AWS IAM console - SageMaker role setup
your role arn should be placed in settings.py file.
In the tutorial using jupyter mentioned above is shown how to get an inference (image map/png) right after the training procedure, but not through an existing endpoint. This, would be an inference in runtime execution:
im = PIL.Image.open(filename)
im.thumbnail([800,600],PIL.Image.ANTIALIAS)
im.save(filename, "JPEG")
with open(filename, 'rb') as image:
    img = image.read()
    img = bytearray(img)

ss_predictor.content_type = 'image/jpeg'
ss_predictor.accept = 'application/x-protobuf'
results = ss_predictor.predict(img)
But in case to infer from a existing endpoint, this code would not work. So, I found some tips here, where is explained that I would just need to invoke the endpoint by a boto session, then, pass the image with a known content to a invoke_endpoint to finally get an inference. But, still, it end in an error like:
UnicodeDecodeError: ‘utf-8’ codec can’t decode byte 0xd7 in position 2: invalid continuation byte
which is related to the StreamingBody reading. So, the response should be read (translated to bytearray), and then, use the from sagemaker.amazon.record_pb2 import Record to finally get the semantic mask:
def infer(self, filename, endpoint):
    """ """
    runtime = boto3.Session().client('sagemaker-runtime')

    image = pillow.Image.open(filename)
    image.thumbnail([800, 600], pillow.Image.ANTIALIAS)
    image.save(filename, "JPEG")

    with open(filename, 'rb') as f:
        payload = f.read()
        payload = bytearray(payload)

    response = runtime.invoke_endpoint(EndpointName=endpoint, ContentType='application/x-image', Body=payload)

    results_file = 'results.rec'
    with open(results_file, 'wb') as f:
         f.write(response['Body'].read())

    rec = Record()
    recordio = mx.recordio.MXRecordIO(results_file, 'r')
    protobuf = rec.ParseFromString(recordio.read())
    values = list(rec.features["target"].float32_tensor.values)
    shape = list(rec.features["shape"].int32_tensor.values)
    shape = np.squeeze(shape)
    mask = np.reshape(np.array(values), shape)
    mask = np.squeeze(mask, axis=0)
    pred_map = np.argmax(mask, axis=0)
To visualize the prediction:
    plt.imshow(pred_map, vmin=0, vmax=settings.HYPER['num_classes'] - 1, cmap='jet')
    plt.savefig(filename)
finally, the result of pred_map:
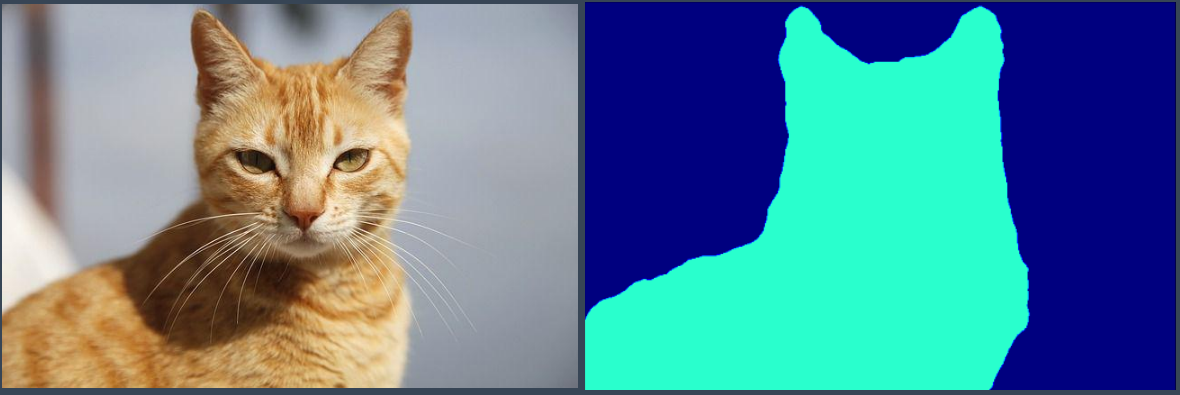 Example of inferences using a ‘cat’ as object
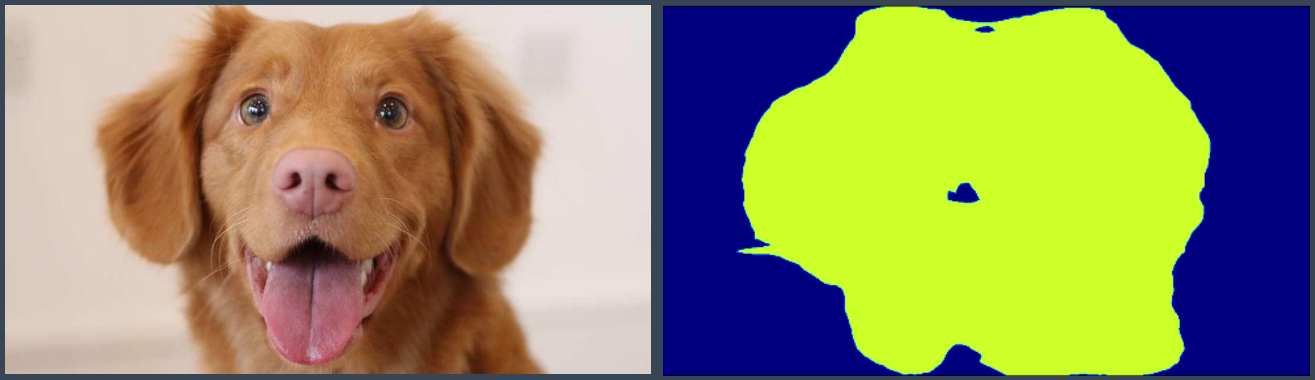 Example of inferences using a ‘dog’ as object
This was just a small example using PascalVOC dataset. There are a lot to improve and get the code a bit more robust for boosting the training and get infereces over demand, as well using another kind of application, such as aerial images for land change detection. Said that, I hope to get more examples and different deep learning models rather than resnet, for instance, unet, pspnet, deeplab3+, and others.
The post is short, but feel free to contact me any time. My tip is to clone the code, and study it as it is.